What is a cubic yard, and why is it used for concrete?
A cubic yard is a standard unit of volume measurement in the U.S. construction industry, representing a cube that is 3 feet long, 3 feet wide, and 3 feet deep. It is used for concrete because projects require large volumes of material, and it provides a manageable number for ordering; for example, ordering 5 cubic yards is more practical than ordering 135 cubic feet.
What is the basic formula to calculate cubic yards for a slab?
The fundamental formula for any square or rectangular slab is: Length (ft) x Width (ft) x Depth (ft) / 27. You must first convert all measurements into feet, and dividing by 27 converts the total cubic feet into cubic yards, as there are 27 cubic feet in one cubic yard.
What are the step-by-step instructions to calculate the concrete needed?
Follow these four critical steps for an accurate calculation:
- Measure the Dimensions: Accurately measure the length and width of the area in feet. Measure the depth (thickness) in inches.
- Convert Depth to Feet: Convert the depth from inches to feet by dividing the number of inches by 12 (e.g., 4 inches / 12 = 0.333 feet).
- Calculate Cubic Feet: Multiply the length, width, and depth (in feet) together to find the volume in cubic feet.
- Convert to Cubic Yards: Divide the total cubic feet by 27 to get the volume in cubic yards.
Can you show me a practical calculation example?
For a 20-foot by 20-foot slab with a 4-inch thickness, the calculation is as follows:
- Step 1: Length = 20 ft, Width = 20 ft, Depth = 4 inches.
- Step 2: Depth in feet = 4 / 12 = 0.333 ft.
- Step 3: Cubic Feet = 20 ft x 20 ft x 0.333 ft = 133.2 cubic feet.
- Step 4: Cubic Yards = 133.2 / 27 ≈ 4.93 cubic yards.
Therefore, you need approximately 4.93 cubic yards of concrete for this slab.
Why should I order more concrete than my calculation shows?
You should always order an extra 5% to 10% more concrete to account for spillage during pouring, uneven subgrade, over-excavation, or slight measurement errors. This buffer prevents the costly and problematic scenario of running short before the pour is finished.
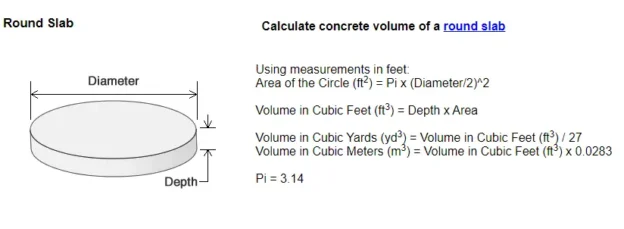
How do I calculate concrete for a circular slab or other odd shapes?
For a circular slab, use the formula: 3.14 x (Radius in ft)² x Depth (ft) / 27. For other irregular shapes, break the area down into smaller rectangles or circles, calculate the cubic yards for each individual section, and then add those volumes together for the total.
What common mistakes do people make when calculating concrete?
The most frequent errors include:
- Not converting inches to feet: Forgetting to divide the depth (in inches) by 12 before calculating volume.
- Ignoring the waste factor: Ordering the exact calculated amount with no buffer for errors.
- Mismeasuring depth: Taking a single measurement on uneven ground instead of averaging multiple points.
- Miscalculating complex shapes: Failing to correctly break down an L-shaped or curved patio into calculable sections.
How much area will one cubic yard of concrete cover?
One cubic yard of concrete will cover 81 square feet at a standard 4-inch thickness. The coverage area changes dramatically with thickness; the same yard will cover only 54 square feet at 6 inches thick or 108 square feet at 3 inches thick.
Is it better to calculate manually or use a concrete calculator app?
For speed, accuracy, and to eliminate human error, a dedicated concrete calculator app is highly recommended. These digital tools automatically handle unit conversions, apply waste factors, and include formulas for complex shapes, ensuring you get a precise order quantity.
What should I do after I know how many cubic yards I need?
After calculating your total cubic yards (including the waste factor), you should contact local ready-mix concrete suppliers to place your order. Be prepared to tell them the volume, the required compressive strength (PSI) for your project, and if you need any special additives, such as fibers for reinforcement or accelerators for cold weather.
Final Recommendation
To calculate cubic yards for a slab, always use the formula (Length x Width x Depth (in feet) / 27), add a 10% waste factor, and use a calculator app to verify your math. For a standard 24x24x4 slab, you will need approximately 7.1 cubic yards, so ordering 7.75 to 8 cubic yards is a safe and prudent decision.